How to Register for Classes
Registration System in LeopardWeb
Watch this video for a demonstration of how to create a plan and register for classes within the new registration system!
Registration System
Please review the instructions below to register for classes in the registration platform.
When navigating in Student Self-Service Class Registration, make sure to use only one browser window when registering. Switching between multiple browser tabs while registering for classes may result in errors, freezing, and data not showing correctly.
-
Accessing the LeophardWeb Registration Platform
Log into your myWentworth portal by navigating to my.wit.edu and entering your credentials.
Image Image
Image
Click on the Class Registration or LeopardWeb tile on the myWentworth home page.
Image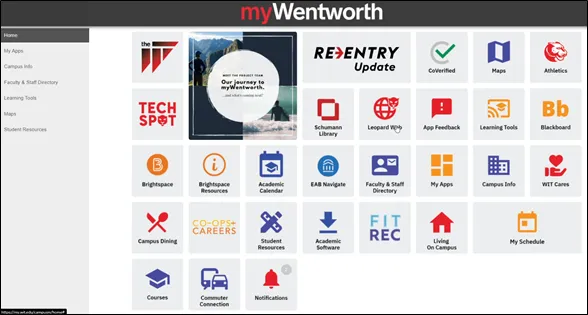
(magnified from above)Image
If you click on the LeopardWeb tile, you will be directed to the new LeopardWeb home page. Click on the Registration option.
Image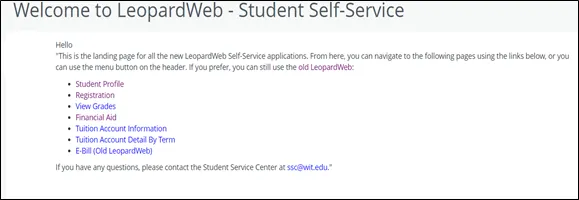
This will bring you to the Registration menu. (If you clicked on the Class Registration tile in Step 2, you will arrive here directly.)
Image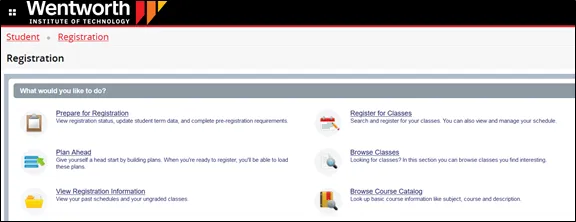
-
How to Prepare for Registration
In the Registration menu, select the Prepare for Registration option.
Image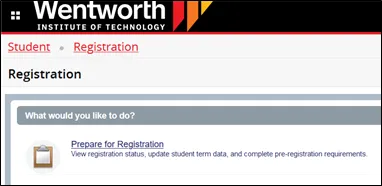
Select a term from the Terms Open for Registration drop-down menu and click the Continue button.
Image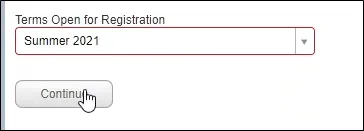
This screen will show you:
- Your student/academic status and whether it permits you to register:
Image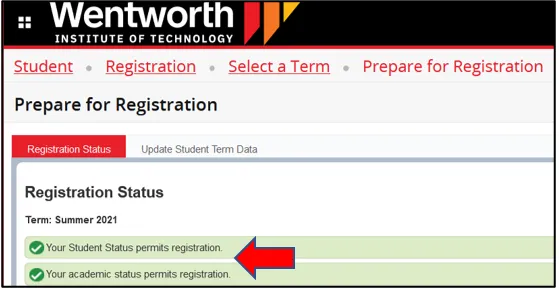
- If your account is inactive, you will see the message that Your Student Status prevents registration:
Image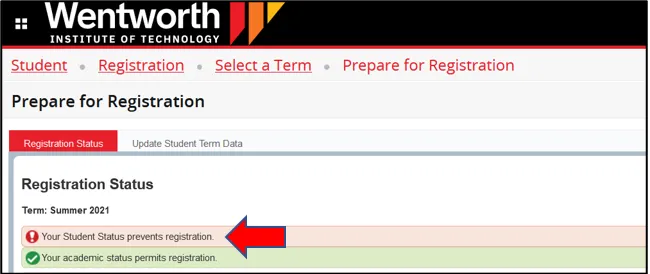
- Any hold(s) on your account which prevent registration, and detailed information about the hold(s):
Image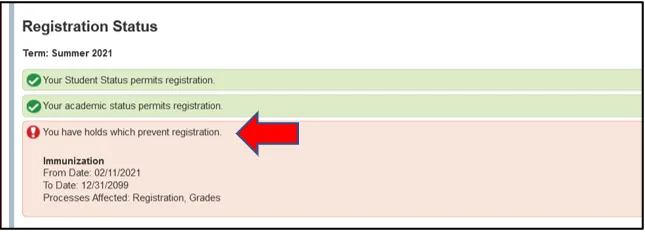
- Your time ticket information (which day/time you can begin registering for classes):
Image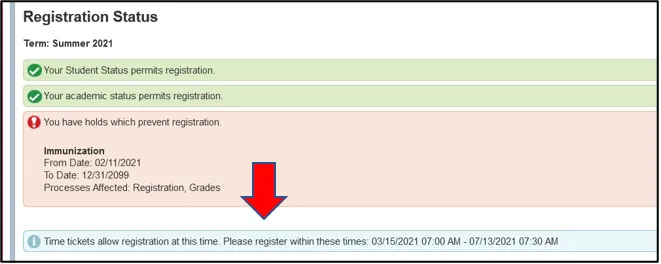
- Any overrides that have been entered by the School to allow you to register for certain classes:
Image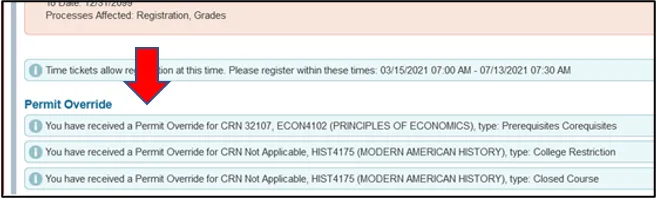
- On this screen, you can also see your Primary Curriculum Information (level, college, degree, program, campus, catalog term, admit term, major, minor, concentration, department):
Image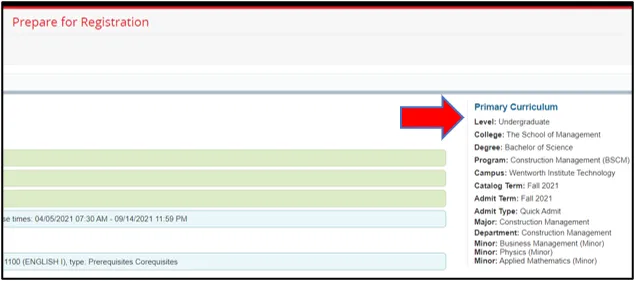
Back on the main Registration menu, if you select the View Registration Information option, you can view your current or past class schedule(s) in list and calendar views.
Image
Under the Active Registrations tab, you can view detailed information about the classes you are registered for in the current term.
Image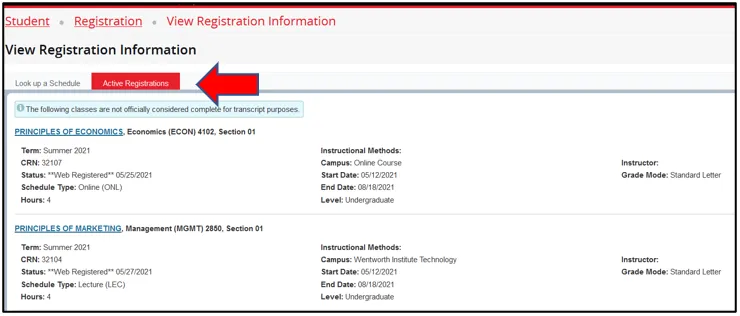
-
How to Create a Plan
In the Registration menu, select the Plan Ahead option.
Image
Select a term from the Terms Open for Planning drop-down menu and click the Continue button.
Image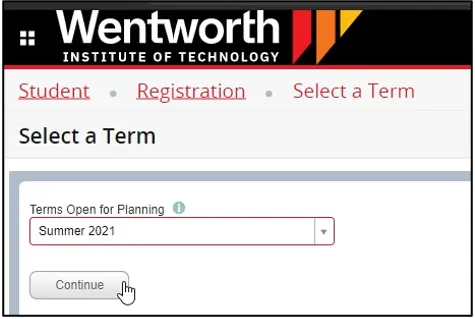
Click the Create a New Plan button to proceed.
Image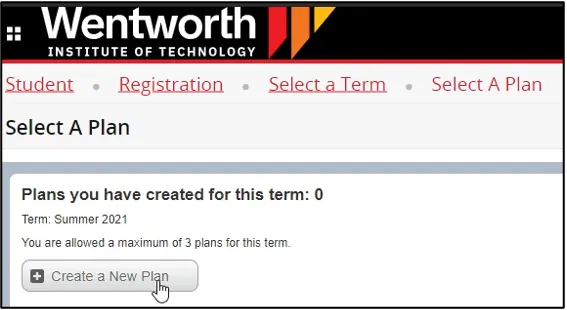
This will bring you to the Find Classes page, where you will enter your search criteria for class sections.
Image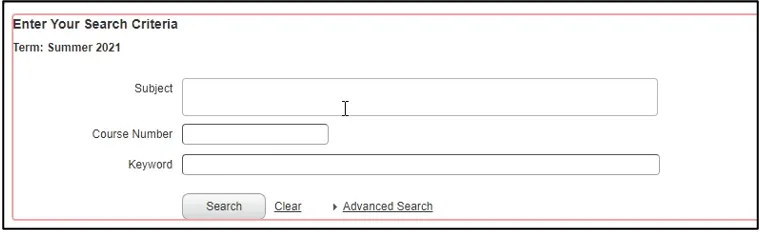
Type in the course subject(s) for which you would like to search. You can also enter the 4-digit course numbers. Click the Search button once you have finished entering your search criteria.
Image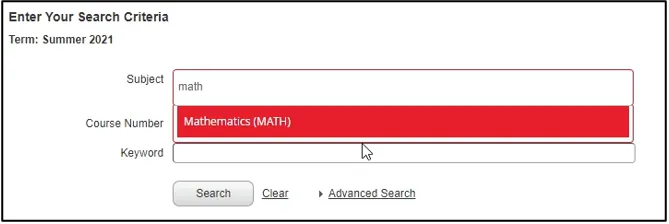
You can also complete an advanced search to use additional criteria to find classes. To do this, click on the Advanced Search option.
Image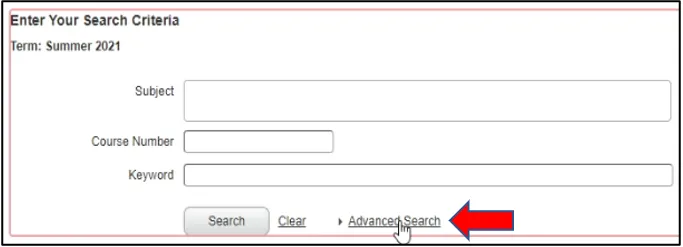
Then, enter your advanced search criteria and click the Search button.
Image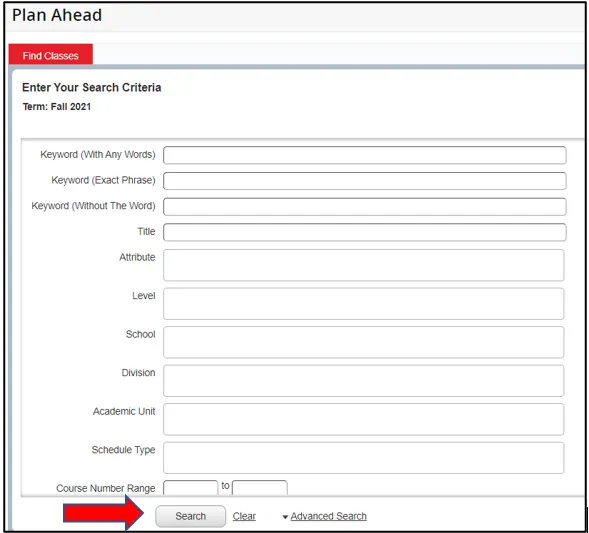
Your search results will appear on the next page. If you want to see the Course Details for a specific course, click on its name on this screen.
Image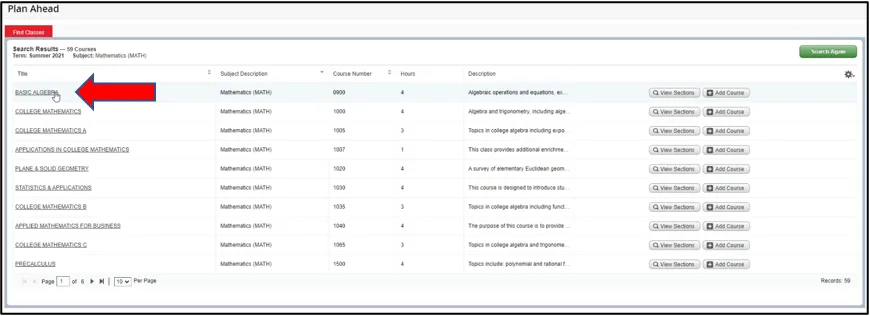
In the Course Details box that appears, click on any of the options on the left to view more information about the course (Restrictions, Prerequisites, etc.). When you are done reviewing this information, click the Close button to close the box.
Image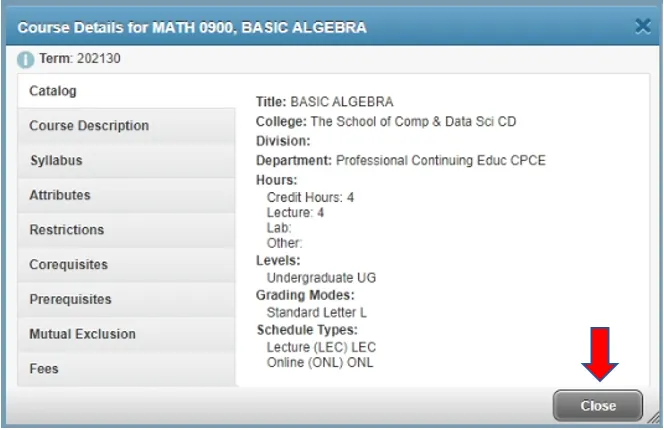
To add a class to your plan, click View Sections to see all available course sections. DO NOT click the Add Course button; if you do, you will have to choose a class section later to register.
Image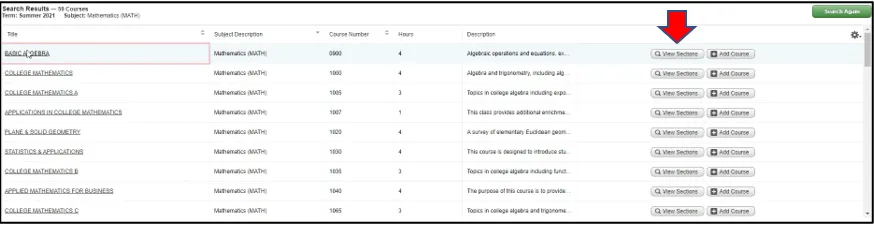
(magnified from above)
Image
Click on the title of the section to view the Class Details.
Image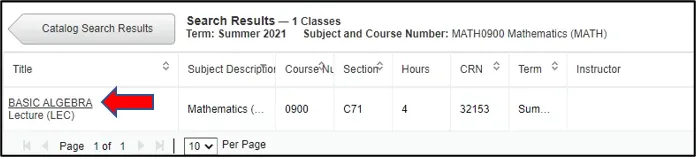
In the Class Details box that appears, click on any of the options on the left to view more information about the class section (Restrictions, Prerequisites, etc.). **PLEASE NOTE – This box shows the details of a specific class section, whereas the earlier box shows details about the course in general.
When you are done reviewing this information, click the Close button to close the box.
Image
Click the Add button to add the class section to your plan.
Image
(magnified from above)
Image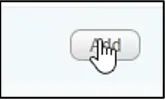
The class will appear in your Schedule and Plan at the bottom of the page. Click the Save Plan button in the bottom right-hand corner to save your plan.
Image
You will then be prompted to name your plan. Type in a name for your plan into the Plan Name box and click the Save button.
Image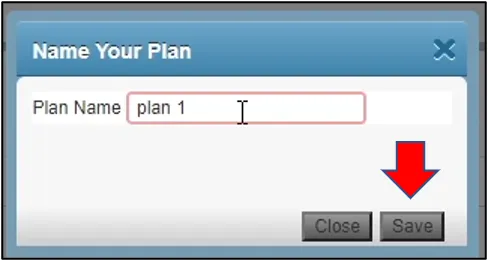
The class you added to your plan will change from Pending to Planned in the Status column. The saved class will also appear in the calendar view of your schedule.
Image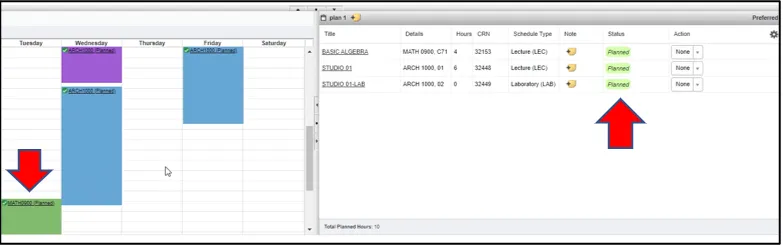
To delete a class from your plan, select Delete from the drop-down menu in the Action column next to the class, and then click the Save Plan button.
Image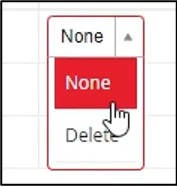 Image
Image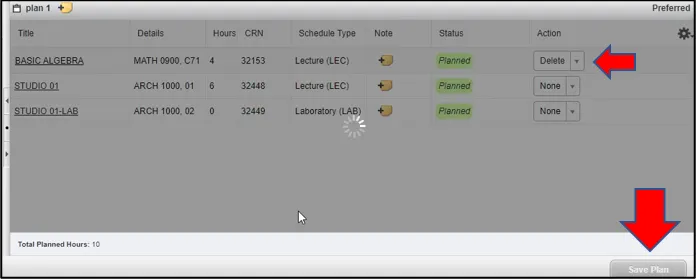
Some classes are linked to an associated lecture/lab class; these are designated by a blue paperclip icon and the words LINKED in the Status column:
Image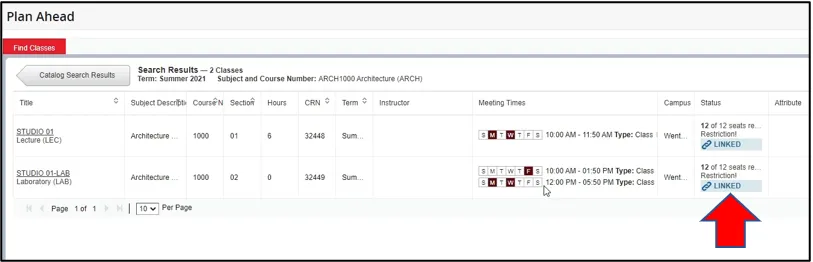
To view the linked class for a class section, click on the View Linked button to the right of the class information:
Image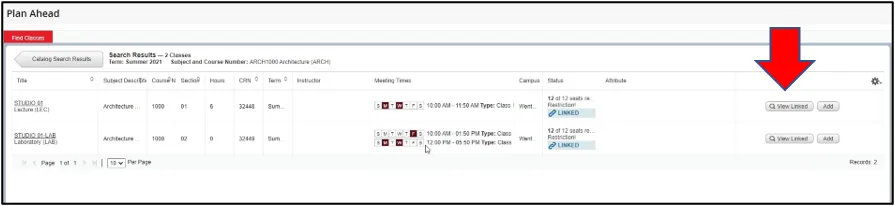
(magnified from above)
Image
The linked class information will show on the next screen:
Image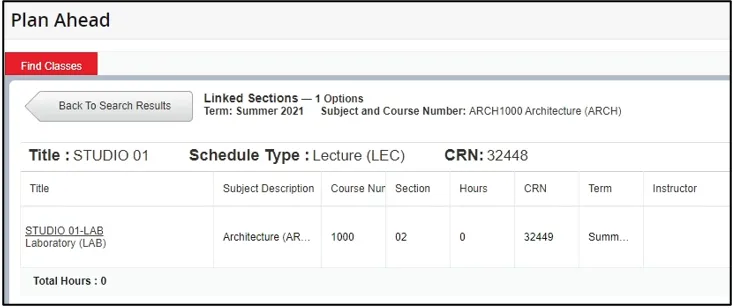
-
Confirming Plan Format before Registration
If your plan looks like this, you have correctly created your plan.
Image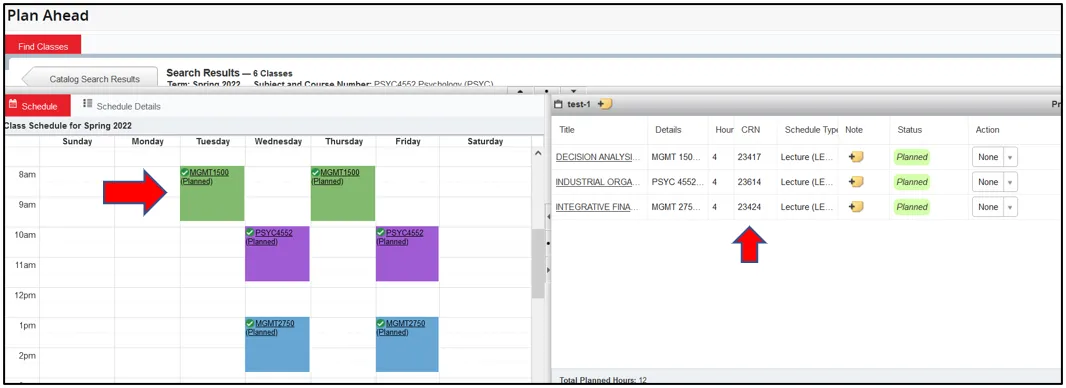
If your plan looks like this, you must follow the steps below to correct your plan.
Image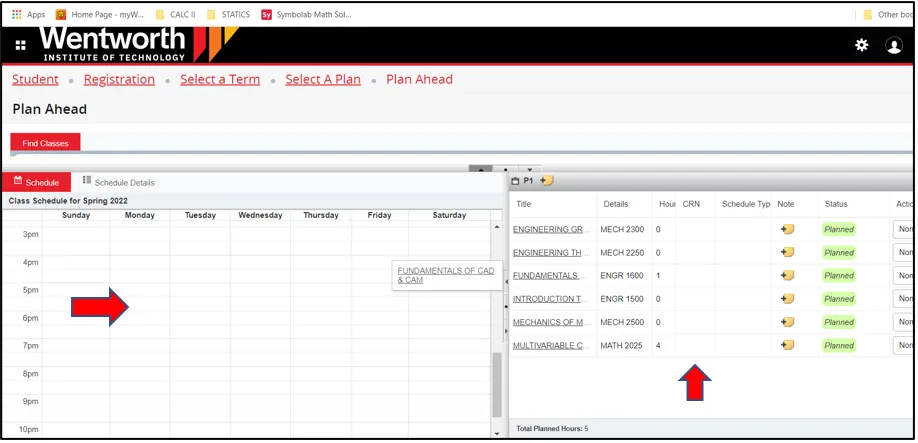
If you do not see CRNs or class times when looking at your plan, it means that you added a course (example: ENGL1100) to your plan instead of a specific class section (example: CRN 24594).
Step 1: Go to Plan Ahead in the Registration menu.
Image
Step 2: Select the Registration Term and click the Continue button.
Image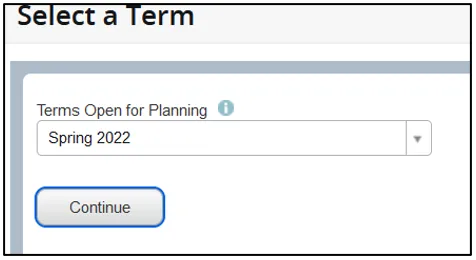
Step 3: Find your plan and click the Edit button.
Image
Step 4: Delete any class in your plan without a CRN by choosing “Delete” from the Action drop-down menu next to each class. Click the Save Plan button to remove the classes from your plan. NOTE: You may want to take a screenshot of the courses in your plan before deleting them, so you remember which classes to search for in the next step.
Image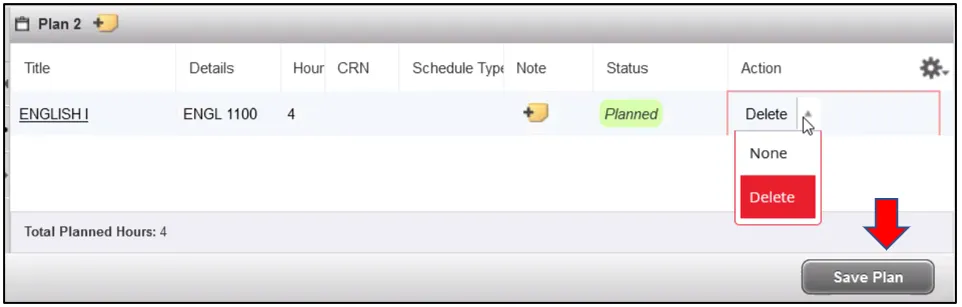
Step 5: Use the Find Classes box to search for your classes again.
Image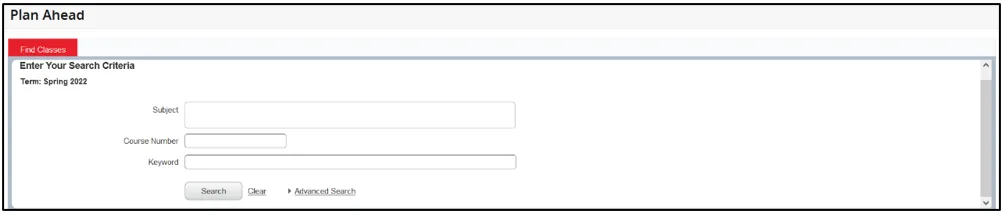
Step 6: When searching for classes to add to your plan, click the View Sections button to view all available course sections.
Image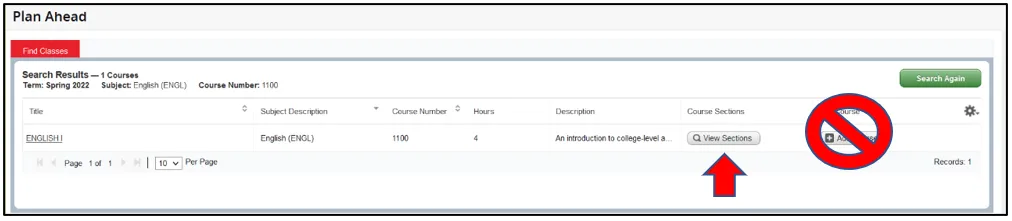
Step 7: When you find the preferred class section, click the Add button to add it to the Summary box. After adding all of your selected class sections, click the Save Plan button to add the classes to your plan.
Image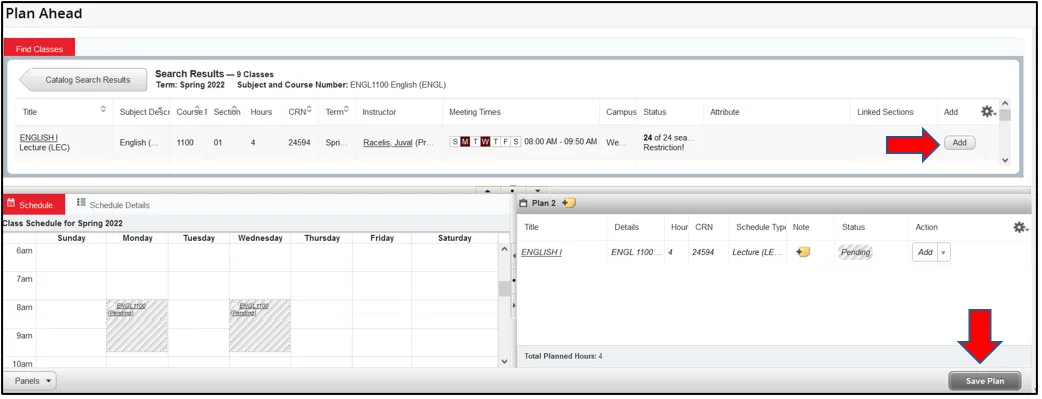
Step 8: Once you click Save Plan, you will see your classes in the Schedule box, and the status next to each class in the Summary box will say “Planned” (also in green).
Image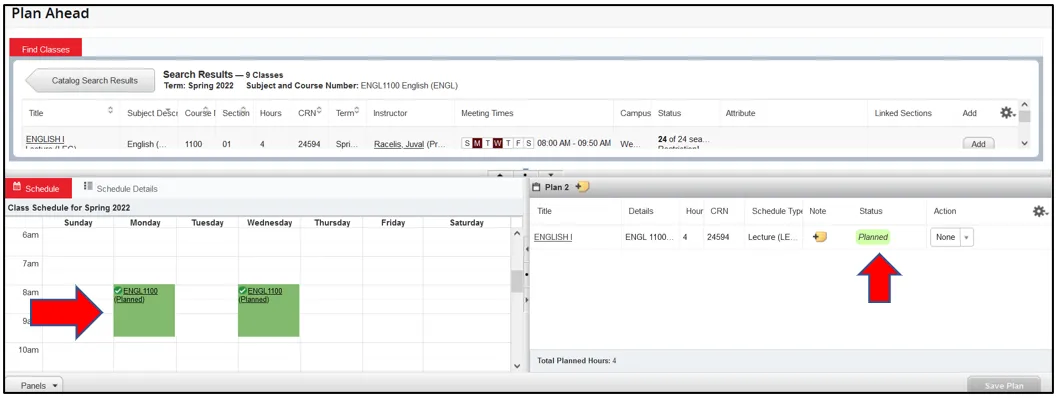
-
How to Register Using a Plan
From the Registration menu, select the Register for Classes section.
Image
Select a term from the Terms Open for Registration drop-down menu and click the Continue button.
Image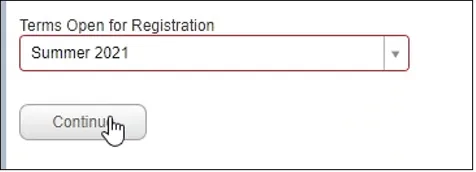
Navigate to the Plans tab on the Register for Classes page.
Image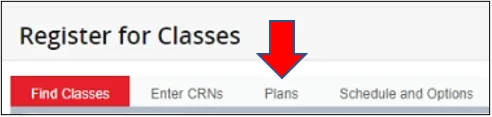
Click the Add All button in the upper right-hand corner of your selected plan to register for all of the classes in that plan.
Image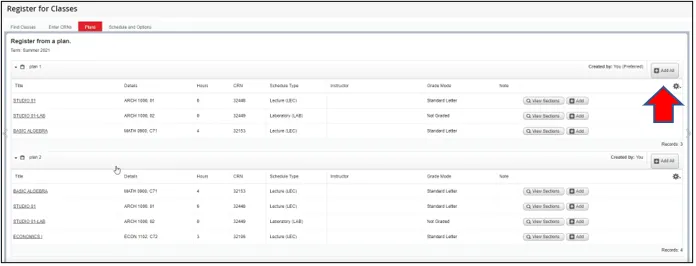
(magnified from above)
Image
This will move your classes into the Summary box with a Pending status. Click the Submit button to register for the classes in this plan.
Image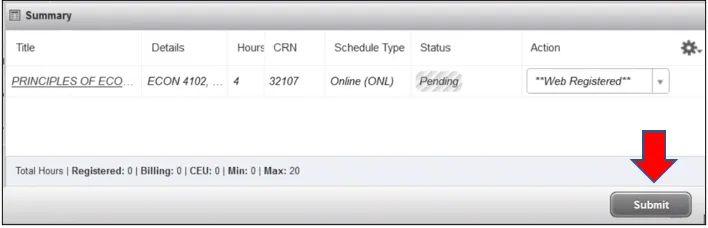
You will then see the word Registered in green in the Status column next to each class for which you have successfully registered.
Image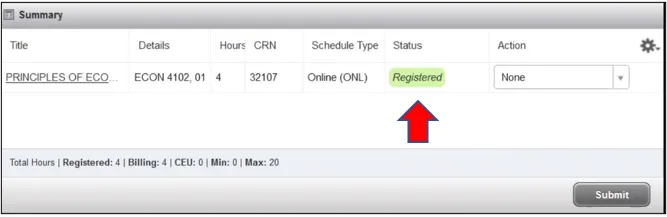
Please navigate to the Registration Troubleshooting section if you encounter any registration error messages.
-
Register by Searching for or Entering CRNs
From the Registration menu, select the Register for Classes section.
Image
Select a term from the Terms Open for Registration drop-down menu and click the Continue button.
Image
Navigate to the Find Classes tab and enter your search criteria to search for classes. This is similar to the process you followed if you created a plan. Click the Search button.
Image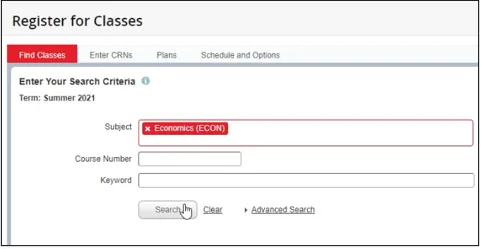
This will bring you to the available list of available classes for the term with your search criteria. Click the Add button to the right of a class to register for that class.
(magnified from above)
Image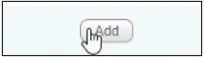
This will add the class to your Summary box:
Image
To register by entering CRNs directly, navigate to the Enter CRNs tab.
Image
Enter your desired CRNs into the provided fields. You can click the Add Another CRN option if you need additional CRN fields to fit all of your classes. When finished, click the Add to Summary button to add the classes to your Summary box.
Image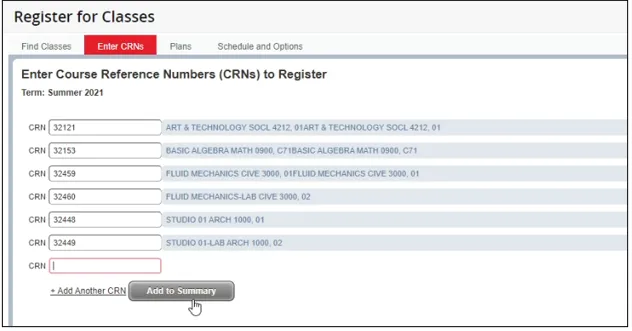
Click the Submit button in your Summary box once you are ready to register for your selected classes.
Image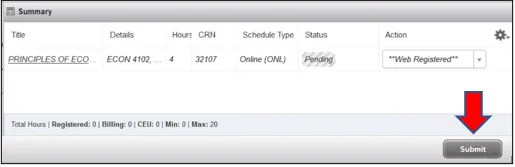
-
How to Drop a Class
From the Registration menu, select the Register for Classes section.
Image
Select the term in which you want to drop a class from the Terms Open for Registration drop-down menu and click the Continue button.
Image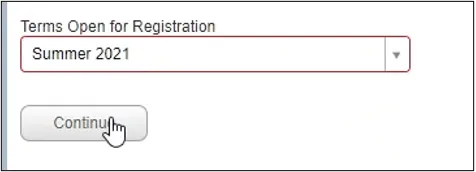
In the Action column of the Summary box, select Web DROP from the drop-down menu next to each class you wish to drop.
Image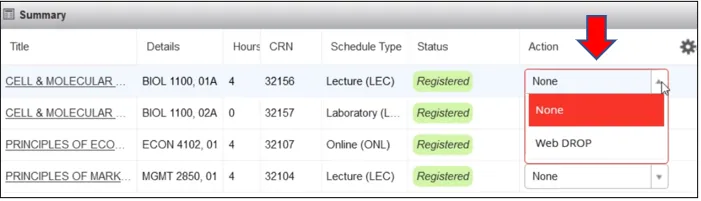
When you have selected all of the classes you want to drop, click the Submit button.
Image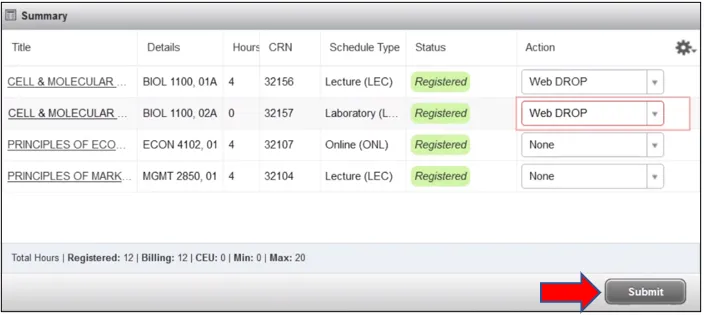
If the classes have been dropped successfully, a green Save Successful message will pop up in the upper right-hand corner of the page. The dropped classes will still show up (but will be grayed out with a status of Deleted) in the Summary box. If you click the Submit button again, the classes will be removed from the Summary box.
Image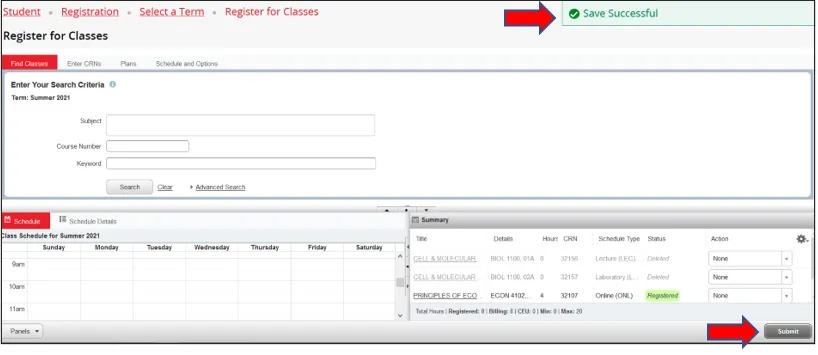
-
Registration Troubleshooting
Holds/Student Status Issues
If you attempt to register for a class or plan and you have a hold on your account, the error message below will pop up in the upper right-hand corner of the page:
Image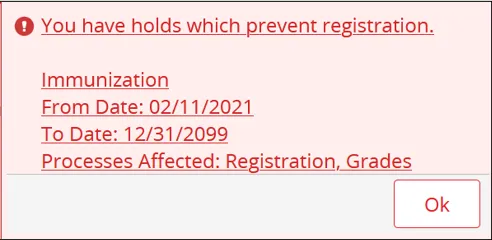
You will need to click the Ok button and resolve your hold before attempting to register again.
If you attempt to register for a class or plan and your current status prevents you from registering, the error message below will pop up in the upper right-hand corner of the page:
Image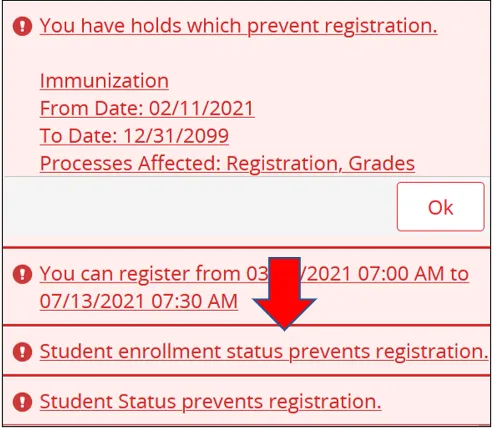
You will need to click the Ok button and resolve your status issue before attempting to register again.
Remember, you should check the Prepare for Registration section on the main Registration page before attempting to register so that you do not encounter either of these issues.
Registration Errors
You may encounter errors when attempting to register for a plan or for individual classes. You would be alerted of the errors after clicking the Submit button on the Register for Classes page.
Image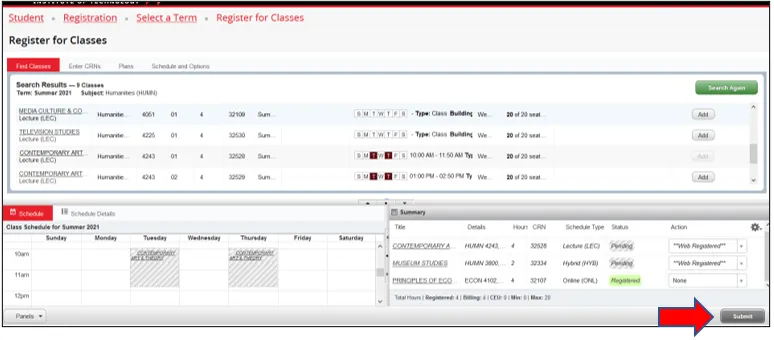
The error message(s) will pop up in the upper right-hand corner of the page:
Image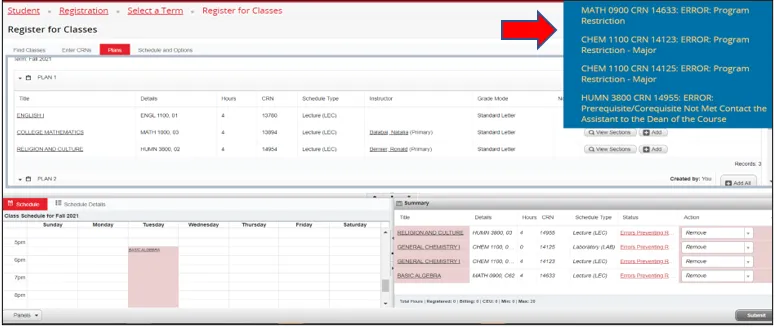
Each error message will note the class/CRN and the specific error that is preventing you from registering for the class:
Image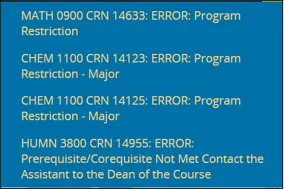
If you do not register for the associated lab class for a lecture, or the correct linked lab section, you will receive the error message below:
Image
You must remove each class for which you receive an error message so that you can register for your other non-error classes. In the Summary box in the lower right-hand corner of the page, make sure the Remove action is selected next to each class with an error, then click the Submit button.
Image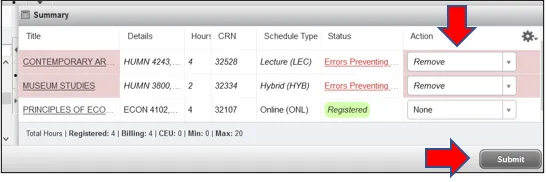
Once you have removed the class(es) with errors, you must reach out to Assistant to the Dean of the School offering the class to request the necessary override. If the override is approved and entered correctly by the School, you should be able to go back in and register successfully.
Image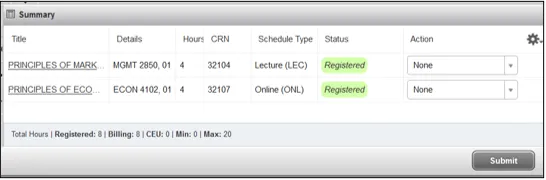
-
How to Troubleshoot a Frozen/Unresponsive Page
Issue 1: When adding a class section in Plan Ahead
Solution 1
Image
*Repeat as necessary to complete your plan
Solution 2
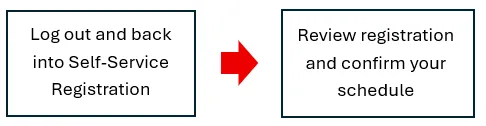
Log out and back into Student Self-Service Registration before adding the same section.
Issue 2: When adding a linked lecture and lab to your planSolution 1
Image
Solution 2
Log out and back into Student Self-Service Registration before adding the sections.
Issue 3: When registering for classesSolution
Image